| |
2009-2011
Astronomical Viewing Blog Archive |
Go to Astronomical Viewing Blog Archive December 27, 2011
Another great night for taking pictures.
I got the camera back from my son and decided to take some pictures with
my Focal Reducer and shoot at F 7.1 instead of F 11. My target for the
night was again the Sculptor Galaxy and also the Running Man in Orion.
The results were phenomenal in my mind.
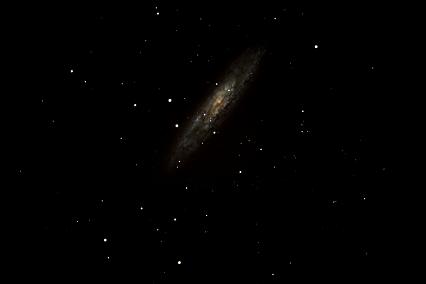 The Sculptor Galaxy NGC 253 shot at F
7.1 for 5 minutes ISO 1000
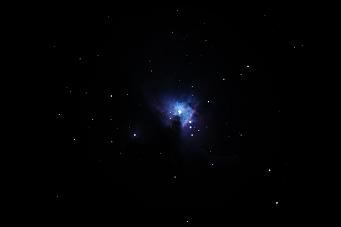
My next shot was Running Man. Using the
f 7.1 focal reducer, I centered the object so that I could just see the
beginning of the Orion Nebula on the right side of the photograph.
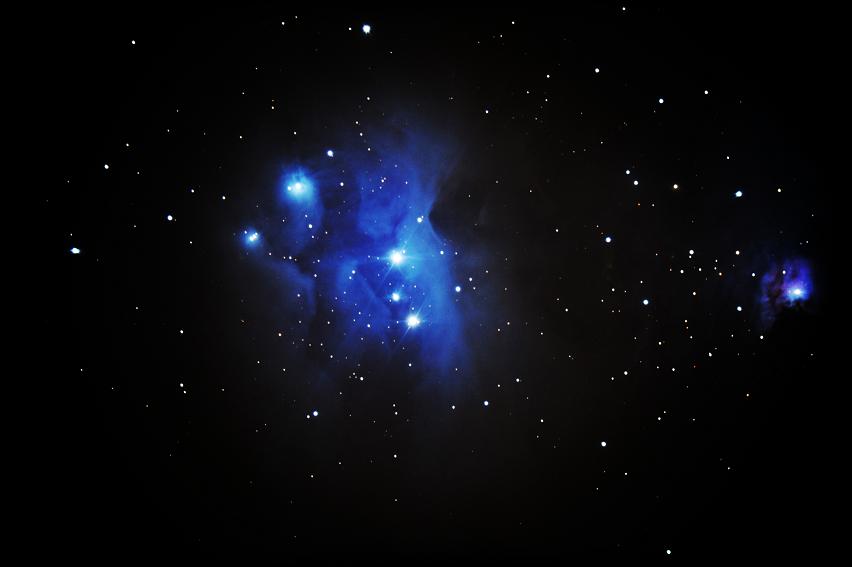 Running Man NCG 1977 in Orion shot at
F 7.1 for 6 Minutes ISO 1000
December 26, 2011
No pictures tonight, just viewing. My son
Brent took his camera, which I have been using for taking pictures of
the heavens. It is Christmas time and he wanted to take pictures of his
family. Families are more important than galaxies and he has two wonderful
children to take pictures of.
Tonight I was trying to determine if I
needed to collimate my scope. I focused (or rather defocused) on Aldebaran.
Everything looks good as far as collimating is concerned. After the check
out of the scope, I had a few minutes and looked at Jupiter. It was a
great night and I could see the Great Red Spot.
December 25, 2011
Merry Christmas to all and remember
who's birth we celebrate!
It is Christmas day, and my brother and
his wife came to visit and see the Observatory. It was only 5:00 PM and
the sun had not yet set. While showing them the scope, I turned it on
and slewed to Venus. To my surprise, we could see the planet while the
sun was still up. On a hunch, I slewed to Jupiter and again to my surprise
we could see the planet and the bands. I could not see the moons of Jupiter,
as it was still a bright blue sky, but we could see the planet. My brother
and his wife were amazed.
December 22, 2011
I finally got the camera setup again and
decided to do a picture of the Sculptor Galaxy NGC 253. I had previously
looked at the galaxy visually, and it was a very dim object at around
7.1 magnitude. I didn't think it would make a very good picture. to my
surprise, it was a great target for astrophotography. It is one of my
favorite shots to date.
 Sculptor Galaxy NGC 253
November 20, 2011
This month has been mostly visual viewing.
I have had a few neighbors over to view the heavens, and my son had the
camera. It is getting cold, but the Warm Room is great. With Orion rising
in the east, M 42 is a favorite of the neighborhood. The photos I took
earlier in Orion, were taken around 3:00 AM. Now you can see the nebulas
around 9:00 AM. Jupiter is also high in the sky and fun to see. Venus
is bright, but just looks like a silver disk. It is low in the Southwest
and there is allot of atmospheric interference.
October 28, 2011
I purchased the Celestron Focal Reducer
Corrector. This corrector changes the focal ratio from F/11 to F/7.1.
This effectively decreases the overall exposure time by about one third.
It also gives a slightly wider field of view. The only problem is that
I get a "Halo" effect on long exposures. Most of this can be
fixed with some post processing of the image. My first attempt using this
reducer was on the Flame Nebula NGC 2024. It is next to the bright star
"Alnitak" in Orion's Belt.
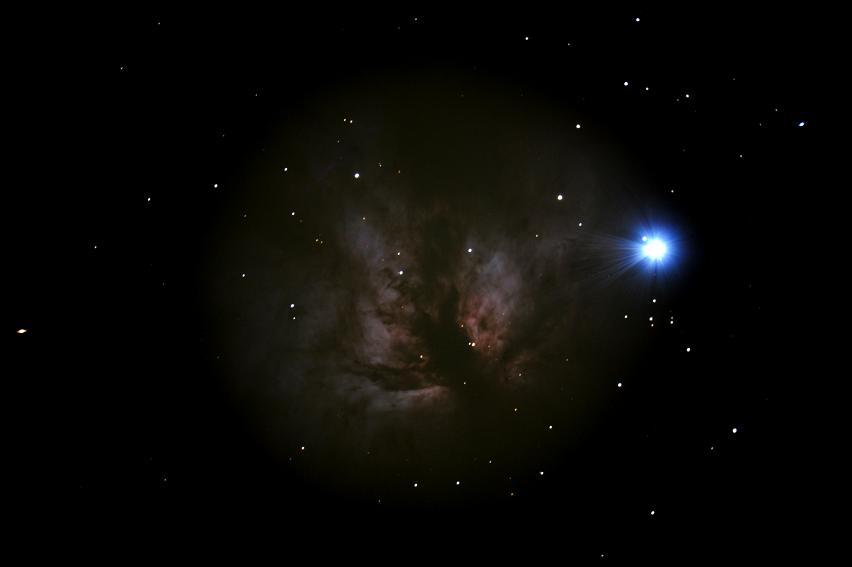 Flame Nebula NGC 2024
October 21, 2011
It was 3:00 AM and I took this shot of
M 42 The "Orion Nebula". With the long focal length of the Celestron
C 1400, I cannot get the entire nebula including "Running Man".
Eventually I will purchase the Fast Star Lens which will give me a much
wider field of view and much shorter exposure times. However, this photograph
I really like. It is zoomed in and gives great detail.
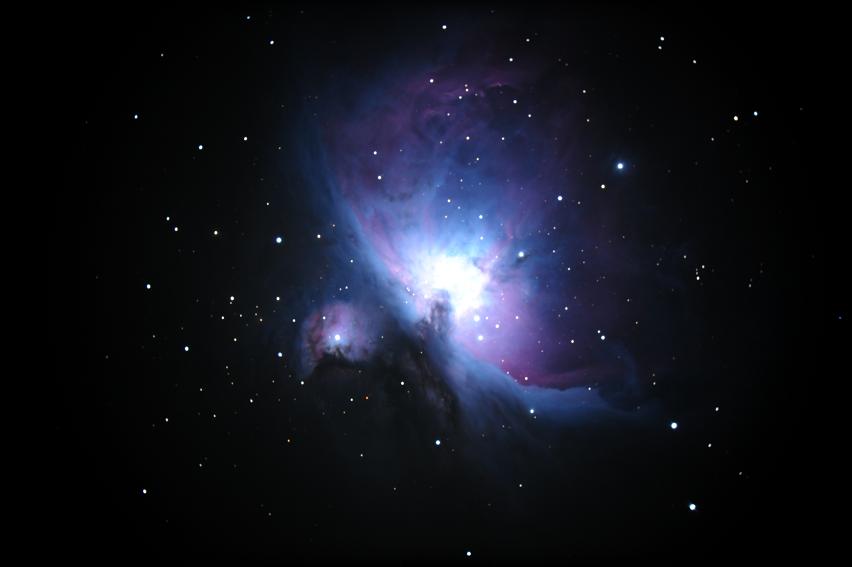 M 42 The Orion Nebula
At the same time I took the M 42 above,
I took a short duration (30 Second) photo with the same ISO setting. This
gave the detail in the center of the nebula.
 M 42 Center ISO 500 for 30 seconds
I then combined the above two photos to
show the detail in the center along with the cloud of the Nebula.
 M 42 showing the core and the cloud.
It was a fun project to get both pictures
together.
September
1, 2011
My first guided astrophotograph
the Great Globular Cluster in the constellation of Hercules M 13. I didn't
have the shot centered in the frame, but it makes a nice contrast with
the surrounding stars.
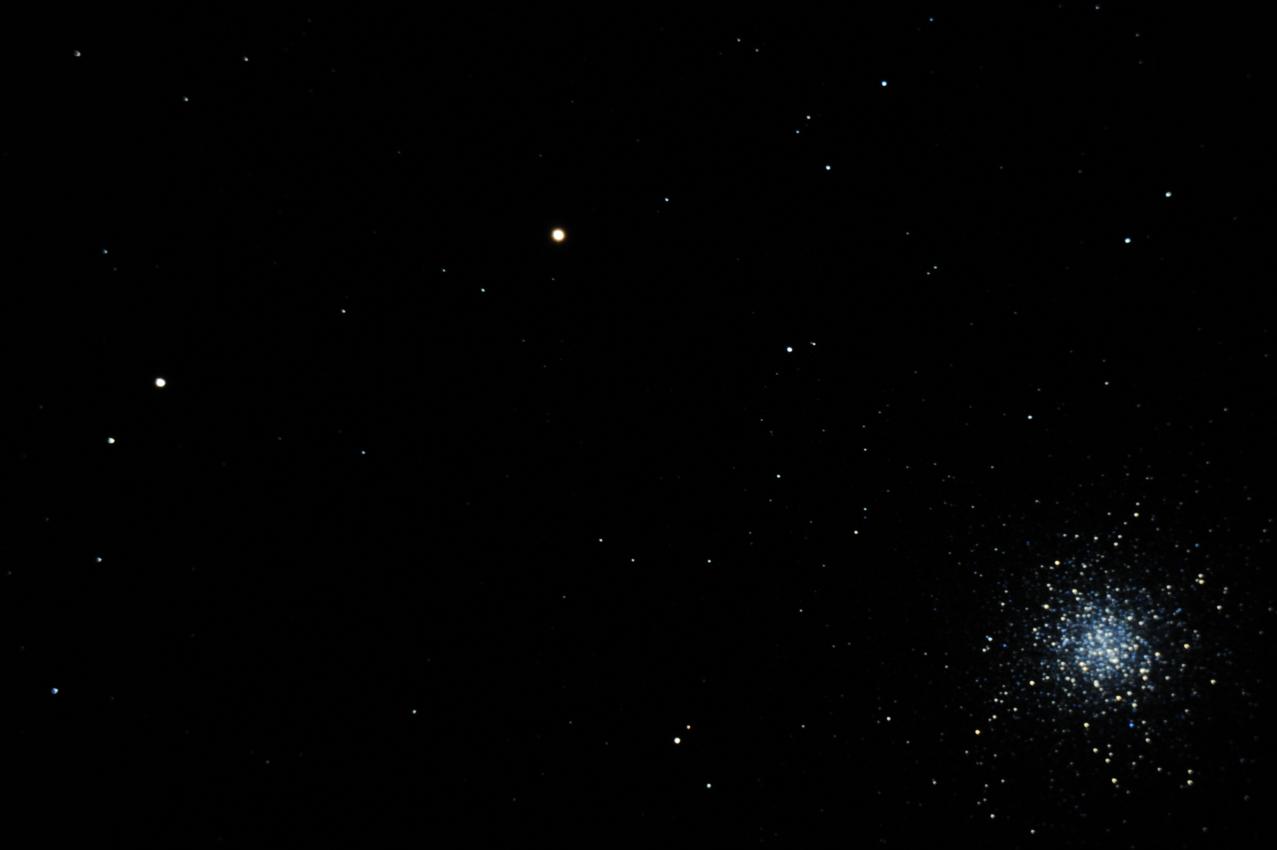 M 13 The Great Globular Cluster in Hercules.
August 23,
2011
I had my first group
come to visit the Dry Creek View Observatory. This was a youth group from
Oak City of about 20 kids ranging from 14 to 18. We were able to see Saturn,
M 13, Ring Nebula, and a look at the double star Albireo. They all had
a good time and Saturn was the hit of the night. Since that night, I have
had a Scout Group, three family groups, and the neighbors over to see
the sights.
August 2011
With the observatory
finished, I set out to do some photography. I quickly learned that accurate
Polar Alignment is essential for good pictures. Being new to photography,
I assumed (incorrectly) that my mount would track well enough for a long
exposure picture. Much to my surprise, after a 10-minute shot, the stars
looked like eggs. I was only good for a 1 minute shot with out having
the stars beginning to look like humpty dumpty before he fell. I also
noticed that the stars on the long exposures had zig zag trails. After
some reading and determining that I was not polar aligned, I begin my
quest for an accurate Polar Alignment. It was at this time I learned that
"Go To" Alignment was not the same as Polar Alignment. The Scope
was "Spot On" when slewing to objects for visual viewing, but
tracking thereafter for pictures was horrendous. The "All-Star Polar
Alignment" feature on the Celestron NexStar hand controller was very
easy to use. I did a Two Star alignment with four calibration stars. Then
I did the AllStar Polar Alignment procedure. I have become proficient
with the alignment procedure now and what used to take me an hour only
took 10-minutes. The alignment is only as good as the centering of the
alignment stars. I do not have a illuminated cross hair eyepiece to accurately
center the stars. So, I used the imaging camera which has a center rectangle,
and I placed the alignment in the center of the rectangle. This made a
world of difference and I now have very accurate Polar Alignment.
Even with the newly
aligned scope, I still could not take long (greater than 5 minute) exposures
without some distortion. Therefore I purchased an "Orion StarShoot
Autoguide" camera and the Celestron 80 mm Guide Scope. Now the real
Astrophotography picture taking has begun.
__
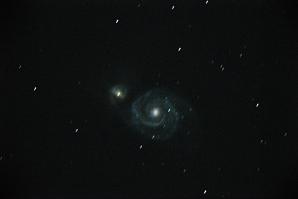 __ __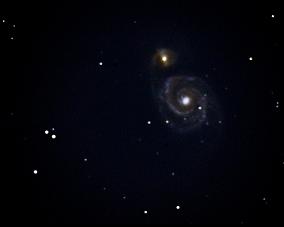 Above, both photographs
of M 51 the Whirlpool Galaxy are unguided. The one on the left was a 2.5
minute exposure with the scope not Polar Aligned. The
photo on the right was a 3 minute exposure with the scope All-Star Polar
Aligned. Notice the trails on the left and no trails on the right.
July 2011
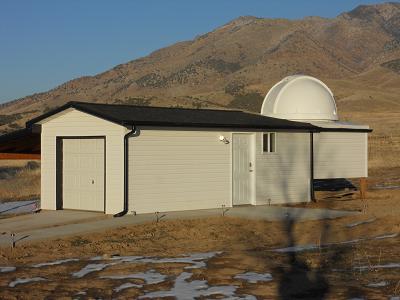
The observatory is finished! The scope
is permanently mounted and what a relief. The alignment settings are spot
on, and within minutes I am viewing the heavens. Thank you Explora-Dome
for making the dome, thank you Brian Anderson the prime contractor and
thank you Ben Nielson for the excellent labor in building the observatory.
Dry Creek View Observatory
 Disaster February 2011
While using my scope on a cold winter night
in February, I noticed the every once in a while during a “Go To”
slew the scope would not stop at the desired coordinates. I would need
to stop the slew manually and then re-align the scope. This happened more
and more frequently. I contacted Celestron Support and they told me to
send the mount back for repair. Three months later I still had not heard
word about my mount even though I had sent repeated Emails. I finally
contacted the support group directly and they sent it back. After a few
nights of use the same problem occurred. Again I was told to send it back
this time they would pay for the shipping. Celestron had my mount for
another two weeks and shipped it back. This time there was a terrible
whining noise from the DEC motor. Again I called Celestron and the mount
was shipped back. By this time I was on a first name basis with the support
supervisor. He was very apologetic and even extended my warranty for the
months that the mount was in the shop. Finally in August 2011, I got the
mount back for good. It has been working flawlessly ever since.
July 2010
The design of the observatory was complete
and the concrete footings and pier were poured this month. I could not
use the scope much as I was busy with a project at work.
September 2009 through May 2010
The next year especially 2010 was a very
busy time for me during my day job. I had to travel outside of the country
for a few months and using the scope became difficult. September 2009
through January 2010 I got my first look at the Orion Nebula. M 42. Again
I was impressed with the details I could see with the 14-inch scope and
a 40 mm eyepiece, which gives an effective magnification of about 100.
I also got better at aligning, but it became tedious every time I wanted
to do some viewing. The scope setup took me around 40 minutes and the
alignment took another hour. (I was still not very good at aligning).
I was able to see some globular clusters and the Andromeda Galaxy. I also
took my first picture of M42 by using a piggyback mount and a Nikon D3
camera. It was during the times of setup and takedown of the scope that
I knew I needed to have a permanent location for my scope. Thus the dream
of the “Dry Creek View Observatory” was born.
August 2009
The moon was full and Jupiter was high
in the sky. I tried to do a Two Star Alignment, but I was unsure if I
centered on the correct star. The Mount was pointed north, but probably
not true north. This added to my alignment problems. I told the scope
to slew to Jupiter and it pointed in the general direction, but the planet
was not even in the field of view of the finder scope. Once I manually
moved the scope so Jupiter was in the cross hairs of the finder, I was
thrilled to look through the eyepiece and experience Jupiter through a
14-inch scope. The moon was bright and full, and the alignment was not
good enough to give accurate pointing to deep sky objects.
The Beginning
The beginning of this blog is actually
many months after I saw first light through the telescope. I purchased
the CGE 1400 FS in August, 2009. I set it up and as luck would have it,
it was a cloudy night. I adjusted the finder scope during the day by centering
the scope on a nearby mountain peak and then adjusting the finder scope
cross hairs to the exact location. When the kies cleared I took the scope
outside and set it up. I struggled with the alignment, as I was inexperienced
to the alignment procedures of the Celestron NexStar remote. Thus I promised
myself that if I ever mastered the alignment procedures I would make a
web page and have basic tutorials for the beginner. I have noticed while
searching the web for suggestions, that most Amateur Astronomers prefer
to spout their knowledge and do not explain simply how to do things. I
hope I have bridged the gap to help those who are new to the hobby. I
tried to reminisce the first few months of using the scope so the beginner
can see the problems and successes that I have had. These past events
are just shown with a Month and Year. Once the Web Page came on line,
I used complete dates indicating the events of the night.
|
|
Copyright © 2011 Dry Creek View Observatory |